Wednesday, April 30, 2014

Easy Potato Skins


I'm not even sure if there are words to describe just how delicious these were. I have tried time after time to make a good restaurant style potato skin but they just weren't great.
This one though, O-M-G!
Perfection!
Crispy on the outside and tender on the inside, top these puppies with whatever you like. 

Ingredients:

4-5 Baking Potatoes
3 tbsp Olive/ Vegetable Oil
4 Sliced Cooked Bacon- Crumbled
2 C. Cheddar cheese
Diced Green Onions (optional)
Salt
Pepper
Garlic Powder
Onion Powder


Preheat oven to 425

Slice potatoes as seen in the picture above. Make them a bit thicker so they are sturdy after cooking.
In a bowl, add oil and toss potatoes. Arrange them on a foil lined, greased pan. Sprinkle with salt & pepper. (Use your favorite seasoning as well for added awesomeness!) Bake for 30 minutes.

After 30 minutes, take one out and test it. They should be done. Top with cheese, crumbled bacon, green onions, you name it and sprinkle with a bit more salt/pepper/onion powder.
Bake until cheese is melted.
Let cool a few minutes, they will be HOT!
Serve with your favorite sauce & enjoy!

Om nom nom...

Friday, March 28, 2014

The Art of Upcycling (1)

The Art Of Upcycling
~(1)~

I have recently come to realize the beauty in everyday waste.
What wonderful things we can make from items we would normally toss out or send to the recycling bin!

I knew I should start saving all of these things, these wonderfully upcycle-able pieces of art!


Let's start with baby formula containers! I already have a TON of these saved, and many more on the way. 
Coffee containers may work as well!


For Crayons- Why buy a crayon box??


A mail center? This is something I NEED!


Chalk!


Storage! So pretty, so simple. 
(I'm obsessed with storage ideas! :-)


A medicine box too!
(Keep out of reach from children, though...)


Now, Tic Tacs. This is pretty neat!


Cute baby food jars turned into craft storage! LOVE!


UM...I go through a ton of these a week! 
I'm going to save them now!
(I'm going to turn into a hoarder...OH boy...)


COFFEEEEE!!!!
I love coffee, and I love organization/storage ideas!
Woop!


You can't have coffee without creamer! Right? 
So smart. So darn smart!
(Fill them with easy "get yourself" cereal for kids!)


I might have to drink more wine...
I mean, this is a valid reason right?
I'll go tell my husband. 
(Bahahaha!)


We go through Pace like its going out of style!
I think I can do this.
Oh the possibilities! 


And last but not least, 
TEAPOTS. 
Who doesn't love teapots?
OMG I need to go to garage sales and get more!


I have a lot more where that came from! Stay tuned!!
(Like me on facebook for instant updates!)
Have fun!
:-)


Monday, March 24, 2014

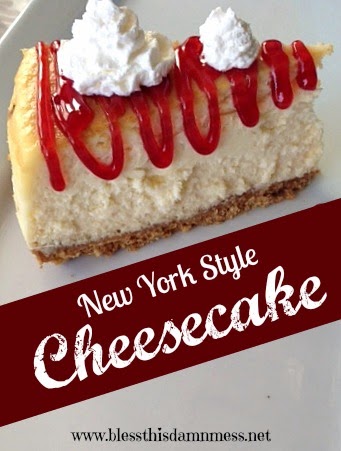
New York Style Cheesecake Recipe


It's not always easy to make a really good cheesecake. Each recipe is different in many ways. I have experimented with the best of the best on the internet and finally found the perfect recipe for a basic New York style cheesecake. This is a MUST TRY!!

What you will need:
1 9in. Springform Pan
1 Large baking pan.

INGREDIENTS:

4 (8oz) Packages Cream Cheese- Room Temp.
4 Eggs
1 1/2 C. White Sugar
3/4 C. Milk
1 C. Sour Cream
1 TBSP Vanilla Extract
1/4 C Flour
Pinch or two of Salt

CRUST:
2 C. Graham Cracker Crumbs
4 TBSP Butter
1/2 TBSP Vanilla Extract
Pinch of Salt

Preheat Oven to 350 Degrees
Grease 9in. Springform pan.

Cover bottom and sides on the outside of your springform pan with aluminum foil to make it "waterproof".  Cooking a cheesecake in a water bath is an easy way to prevent cracking and browning of the cheesecake. 

In a medium bowl, mix graham cracker crumbs, 4 tbsp butter, salt and vanilla. Spread evenly on the bottom of your springform pan. Press firmly.

Bake crust for ten minutes. Remove from oven to cool.

In a large bowl, mix cream cheese with sugar until smooth. Blend in milk, vanilla, sour cream and flour. Add the eggs one at a time, mixing just enough to incorporate. 

Pour filling over the top of the crust and let sit five minutes.

Place your cheesecake into a large enough pan or cake pan. Pour in one inch of water, careful not to get any inside the springform pan.

Bake in the oven at 350 for exactly 1 hour. 
DO NOT PEEK!
Once the hour is over, shut the oven off and walk away.
Let the cheesecake sit in the oven to cool to room temperature- about 5-6 hours.
Refrigerate after the 5-6 hours is done, and it should look perfect! (And TASTE perfect too!!)

Top with whatever your little heart desires. I love strawberries myself! :-)

Enjoy! There really is nothing as good as a great cheesecake. Ahhh heaven on a plate!